Is climbing safe? How to climb safely as a beginner
Updated 7 October 2026
Climbing in a gym is reasonably safe if you follow the rules, and most serious accidents come from a handful of avoidable mistakes: landing badly when bouldering, an unfinished knot or a belaying error on ropes, and forgetting to clip into an auto-belay. Learn to fall, check each other before every roped climb, and build up slowly to avoid the finger and shoulder injuries that come from doing too much.
How risky is it?
The British Mountaineering Council describes top-rope climbing as very safe, and points to figures suggesting that for children, rugby, football and cricket all carry a higher injury risk than climbing. Accidents do happen, though, and they follow clear patterns.
In 2025 the German Alpine Club (DAV) and the climbing gym associations analysed 252 serious accidents in gyms in Germany and Austria. 69% happened while bouldering, nearly nine in ten of those from falls onto the mats, and almost half of those falls ended in a twisted ankle or leg. Accidents on ropes were fewer but more often severe, and every ground fall from an auto-belay that year happened because the climber hadn’t clipped in.
Bouldering: learn how to fall
Every bouldering fall ends on the mat, so the way you land matters more than anything else:
- Land on both feet at once, with your knees bent to absorb the impact.
- Roll back onto your bottom and back instead of trying to stay standing.
- Keep your arms in. Don’t put your hands out behind you or down to catch yourself; that’s how wrists, elbows and shoulders get hurt.
- Climb down rather than jumping from the top. Use the easiest holds to get most of the way down, then drop the last bit.
Keep the fall zone clear
- Don’t walk or stand under someone who’s climbing, and don’t sit on the mats where people land.
- Keep the mats clear of bags, water bottles and phones.
- Don’t climb directly above, below or too close beside someone else, and allow plenty of room for where they might land.
- Watch children closely. The mats aren’t a playground.
Ropes: the partner check, every time
Before every climb, the climber and belayer check each other’s setup, with eyes and hands. It takes ten seconds and catches the mistakes behind the worst accidents. Check:
- Harnesses: on properly, waist belt snug above the hip bones, buckles fastened.
- The knot: a finished figure-eight follow-through, threaded through both tie-in points on the harness (not the belay loop), with a tail sticking out.
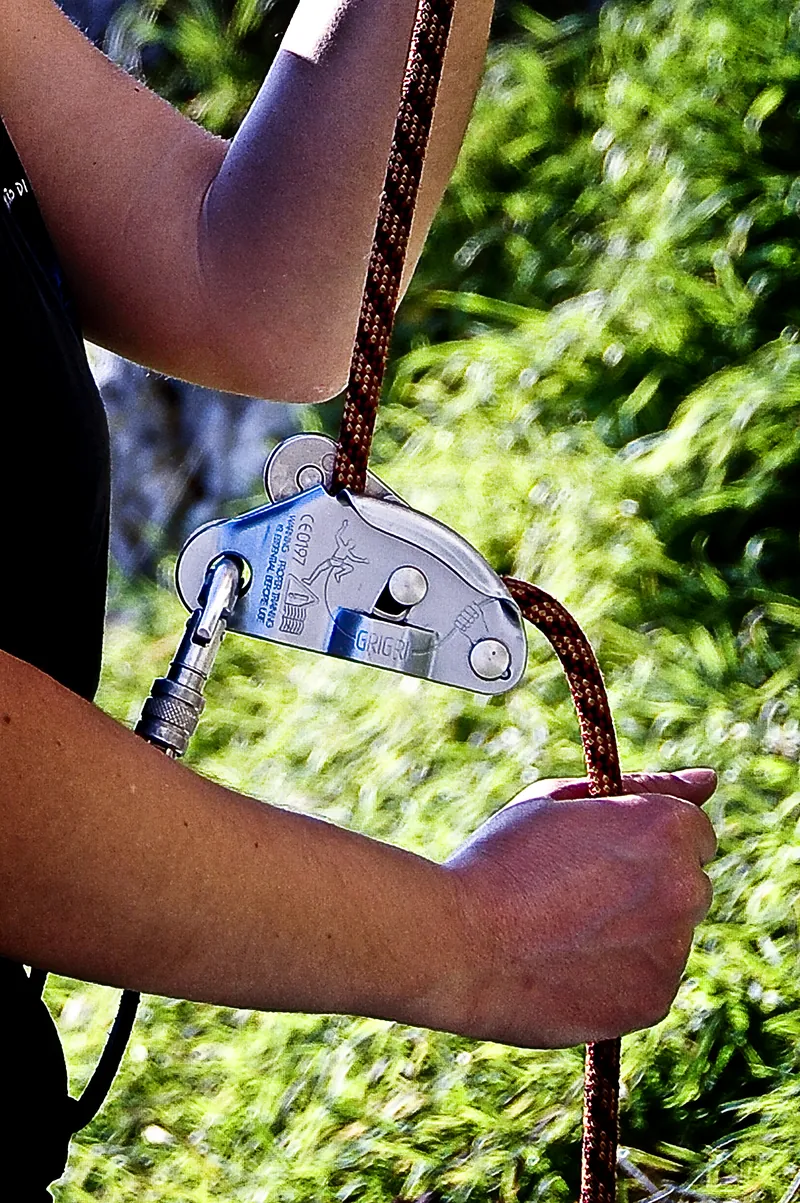
- The belay device: rope threaded the right way, clipped to the belayer’s belay loop with a locking carabiner. With an assisted-braking device, pull the climber’s side of the rope sharply to check it locks.
- The carabiner: gate closed and locked.
- The end of the rope: a knot in the end, so it can’t run through the belay device.
Then agree your calls before you start, such as “take” and “slack”, so you both know what the other means.
Learn to belay from a person, not a video
Belaying is a skill you learn in person, on a course or from an instructor. Gyms check you can do it before letting you belay without staff. The core rules:
- Brake hand on the rope, always. Keep it low and never let go.
- Watch your climber the whole time, stand close to the wall and don’t leave unnecessary slack in the rope.
- Mind big weight differences. If the climber is much heavier than you, ask staff about anchoring yourself or using an extra device.
Auto-belays: clip in, every time
Auto-belays are reliable; the people using them aren’t. In Germany and Austria, about one person a year has died in an auto-belay accident since 2018, usually because they started climbing without clipping in. It happens to experienced climbers too: when a routine becomes automatic, it’s easy to skip a step without noticing, especially after a rest or a chat.
- Clip in before you touch the wall, the way the gym showed you, and check the carabiner gate is closed.
- Make it a ritual: point at the carabiner and say “clipped” out loud.
- Check again after every break. Most people forget after unclipping to rest or talk.
- Stay in line with the device so you don’t swing if you fall, and check the gym’s weight limits.
- On your first go, let go low down to feel the device take you before you climb high.
If the gym has a gate or a mat in front of the auto-belay, it’s there to stop you starting without clipping in. Don’t climb around it.
Lead falls need a trained belayer
In lead climbing, you fall twice the distance to your last clip, plus rope stretch, and a careless belay can mean hitting the wall or the ground. Nearly half the roped accidents in the DAV’s 2025 figures happened on lead, often while clipping. Don’t lead, or belay a leader, until you’ve done a lead course and passed the gym’s lead check.
Most injuries come from doing too much
The most common climbing injuries aren’t from falls but from overuse, especially of the fingers and shoulders. Finger pulley injuries, where the bands that hold a finger’s tendons in place are strained or torn, are the most common finger injury in climbing. Muscles get stronger faster than tendons, so beginners can often pull harder than their fingers are ready for.
- Warm up with light exercise and easy climbs, and increase the intensity slowly.
- Progress gradually. Don’t jump straight to the hardest climbs, or climb several days in a row in your first months.
- Stop when you’re tired. Most injuries happen on “one last go”.
- Rest when something hurts, and give injuries time to heal. If finger or shoulder pain doesn’t settle, see a doctor or physiotherapist.
Outdoors needs more knowledge
On rock there are no gym staff, no padded floor, and nobody has checked the anchors. Bolts can be further apart, rock can be loose and landings uneven, and you are responsible for the rope length, the anchor at the top and the knot in the end of the rope. Wear a helmet, and drop your grade a long way for your first outdoor climbs.
Don’t try to work it out alone. Take a course with a qualified instructor, join a club, or go with someone experienced. Types of climbing explains what each outdoor style involves, and our crag check shows how much rope and how many quickdraws a crag needs.
Sources
- BMC: Climbing wall safety resources
- BMC: The basics: climbing indoors
- BMC: Beginner climber FAQs
- DAV: Sicher Bouldern indoor (5 DAV recommendations)
- DAV: Indoorklettern, the 10 DAV climbing rules
- DAV: Automatisch sicher? Climbing with auto-belays
- DAV: Climbing gym accident statistics 2025
- DAV: Indoor climbing certificates (Kletterscheine)
- American Alpine Club: Gold Standard Curriculum, belaying
- Climbing Business Journal: Auto belays get safer with barriers
- Movement Climbing + Fitness: How to fall when bouldering
- BMC: What gear do you need to climb indoors?
- Wikipedia: Lead climbing
- Wikipedia: Auto belay
- Zieliński et al. (2025): Epidemiology of musculoskeletal injuries among climbers, a systematic review
- Wikipedia: Climbing injuries
- BMC: Top tips for new outdoor climbers
- BMC: How to move from indoor to outdoor climbing
Read more
- How to start climbing: a beginner’s guide
- Types of climbing explained: bouldering, top rope, lead, auto-belay and more
- Why are there so many climbing grade systems?
- Bouldering grades explained: the V-scale and Font
- Sport climbing grades explained: French, YDS and UIAA
- Can you compare bouldering and sport climbing grades?
- The hardest boulders in the world (2026)
- How hard is V17?
- How long does it take to climb V5?
- Stuck at V4 or V5? Why climbers plateau, and what helps